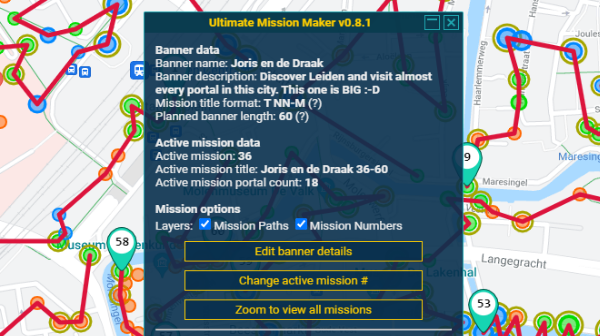
UMM Options Menu

There are 2 ways to start a banner:
- Either click the Start button on the IITC canvas or
- Open the UMM Opt dialog from the canvas or from the right hand menu
This opens up the UMM options dialog:
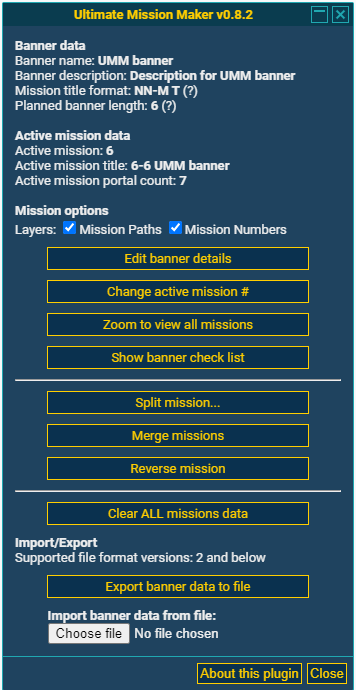
The upper part of the dialog shows the details for the current banner. We'll get into that in the UMM Banner Details post.
Followed by 2 tick boxes for layers, one to show/hide the Mission Path, the other does the same with Mission Numbers.
Then there is a series of buttons:
- Edit banner details - Shows the edit dialog described in the UMM Banner Details post.
- Change active mission # - Lets you change the active mission same as the Mission Counter button on the IITC canvas.
- Zoom to view all missions - Set the correct zoom factor so that IITC shows the complete banner.
- Show banner check list - Shows an overview of the banner, missions and portal objectives (for details se the UMM Banner Check List post).
- Split mission... - Shows the split mission dialog described in the UMM Mission Splitter post.
- Merge missions - All current missions will be merged into 1 mission.
- Reverse mission - Reverses the order of portals in the chosen mission.
- Clear ALL mission data - Resets all banner data.
- Export banner data to file - Exports your data, in a json file, to the default download folder.
- Import banner data : Choose File - Lets you import a json banner file. This will overwrite all banner data in the dialog.
The Usage Split, Merge & Reverse post will explain some cases for which you can use the split, merge and reverse functions.